
Wow, it has been so long since my last post! As some of you may have heard I have been working so hard at creating a new business- Grateful Grahams. A homemade vegan graham cracker that I am packaging and selling! So with that project keeping me busy I haven't had time or rather the ability to write down some of the recipes I have been working on to post here!!
Please know I have some yummy stuff coming your way from pickled beets, coconut granola and some delicious dishes for the Spring and Summer!
Spring Fruit Salad
1 pineapple cut into chunks
2 pears cut into chunks
1 pint raspberries
1 pint blueberries
1 quart strawberries, sliced
1 apple, cut into bite size pieces
Optional but so DeLiCiOuS:
1/3 cup shredded coconut
toasted nuts- walnuts are yum
your favorite yogurt to mix in
Mix all the fruit together and add in any additional ingredients! Our favorite is just a lot of coconut! YUM!
Hope everyone is enjoying the blooms this beautiful Spring is bringing!!
Sunday, April 11, 2010
Wednesday, March 3, 2010
Oh peanut butter, how I love thee
So I was on one of my favorite food blogs/websites; The Tasty Kitchen. A great place that The Pioneer Woman started. I love her too. While I was there looking I saw that today was National Peanut Butter Lovers Day! So I thought we should celebrate too!!
Here is a recipe for my Double Peanut Butter Chocolate Chips Cookies w/ Sea Salt. You read that right- double peanut butter, chocolate and salt. Yes sometimes I just call these heaven.
Double Peanut Butter Chocolate Chip Cookies w/ Sea Salt
1 stick butter, softened
1/2 C peanut butter, go creamy here
1/2 C sugar, I use turbinado in my baking. In case you were wondering
1/4 C brown sugar
1 large egg
1 tsp vanilla
1 1/2 C flour, I love White Whole Wheat Flour. Lighter than regular WW flour and oh so good!
1/2 tsp baking powder
1/2 tsp baking soda
1/3-1/2 C roasted and salted Peanuts
1/2 C dark chocolate chips
1/2 C milk chocolate chips- you of course can use 1 cup of just either kind. No need to mix and match if you don't want to. But why wouldn't you want too?
In your bowl add your butter, p. butter, sugar, b. sugar and egg. Beat this until well combined.
In a smaller bowl whisk your flour, b.powder and soda until well combined. Add to wet ingredients and mix well. YUM! I could eat this right now. Wait. Oh wait!
Ok now add your peanuts and chocolate chips and stir until combined. These are going to look crumbly, like they aren't going to hold together and you are just going to have to eat all the cookie dough. But now get out your cookie sheet.
Go ahead and turn your oven on to 350 degrees. (one of these days I will learn how to put the little degrees symbol up there...but until then)
Roll your dough into balls, not to big not to small. You will have to push the ingredients together getting chocolate, peanuts and some more chocolate into each bite, umm I meant cookie.
Place on cookie sheet. Next take a fork and lightly press down on each cookie flattening it and leaving a forkable imprint on each! yum!
Place in oven and bake about 10 minutes until you notice a nice golden color. You still want them a little soft. As soon as they come out of the oven sprinkle with salt. Not just any salt - this kind:

I am sure I have talked it about it before and trust me I will talk about it again. I. LOVE. THIS. STUFF. YUM.! Sprinkle it on top and well sure you can wait for them to cool but what fun is that!
Enjoy!
This isn't a great picture of them but it shall suffice for now! Gosh maybe I should make some of these...

Monday, March 1, 2010
sewing...
So after not being very "crafty" as I use those terms loosely I have decided I must change that! I have tried knitting, a few different times. I am proud to say I MADE A SCARF. Yep one scarf made and retirement from knitting soon followed. There is just something about it, it seems to take FOREVER! I am one that loves instant gratification. Quick, simple and done.
When I cook, I can hear the sizzle or smell the aroma from sauteing garlic. Baking you can taste those chocolate chips before you throw them in the cookie batter, you can smell the fresh bread baking in the oven. I love that. Simple and progressive. It took me weeks of knitting before what I could have used as a hanky. It took me all winter to make a scarf which I then gave to my husband, because I wasn't going to wear that holy thing. Ha. And well he is my husband, he HAS to wear it. Right?
So last Christmas my mom got me a sewing machine. Ahh, so a year after getting it I have finally pulled it out of the closet and have been learning how to use it.
Funny how a little machine can do so much. This little machine has created my Craft Day Wednesday's. Pretty much an open house for the day where mama's and babies can come in eat, laugh and craft. Did I mention too that we cry, complain and often ask for advice. I love craft days...
Here are a few pictures of my set up, some crafts I have made and hopefully more to come soon!
the good ol self portrait in my ring sling

Ring Sling

Fun fabric..

Wool diaper covers and pants.

See how close I keep my tea to my machine. Just in case I need a break or something..

Saturday, February 27, 2010
Turkey Meatballs
I do enjoy spaghetti and meatballs. It is so simple but again something that I don't add to the rotation to often, more of a good backup plan in a pinch. And on that I have played around with a few recipes always feeling like they are missing something. So tonight I made a great meatball. A few of my old favorites all combined. Yum!
I made a LARGE batch- I feel with these, may as well go big so we can have leftovers. So now happily in my freezer are about 16 meatballs already and rolled for another nights dinner.
Turkey Meatballs, My Way
Prep- 10 minutes
Cook - 20 minutes + simmering time
Serves - this will make about 30+ average sized meatballs
2 lbs ground turkey, I used 1 lb light and 1 lb dark
2 eggs
1 bunch parsley, chopped very fine
1/3 cup milk
2 slices bread
2 tablespoons tomato paste
5 tablespoons parmesan cheese
1 large onion, diced
5 cloves garlic, minced
salt and pepper
option- ricotta cheese. I would add about a 1/2 cup. I love ricotta and wish I had some when I was making these. They would just add some more awesomeness to these awesome meatballs.
Add 1 tbs of olive oil to a skillet. Saute your onion and garlic. While sauteing add a good heaping teaspoon of salt to your onions. That helps them sweat.
While those are sauteing about 5-7 minutes go ahead and soak your 2 slices of bread in the milk. You may need a bit more milk- but you want the pieces to to be "covered" not soaking. Give those a good 4 minutes or so in the milk.
While you are sauteing and soaking go ahead and start tossing all your other ingredients in a large mixing bowl.
When you onions are done, give them a few minutes to cool down then add them.
Take your bread, gently squeeze out any excessive milk. Then crumble your bread up into your bowl too.
Now get to mixing. You can try doing this with a spoon, but really what's the point. Get your hands in there and mix it good.
Turn oven on to 400.
Get a baking sheet and start plopping meatballs. You can put them pretty close together because it's not like they are going anywhere.
If you want to freeze some too get a plate out and fill up your plate. I stuck the ones for the freezer in my freezer on the plate for about 15 minutes to firm them before putting them in a freezer bag.
Once your baking sheet is as full as you would like them throw them in the oven for about 20-25 minutes. Now, I simmered mine which I will explain in a second- if you plan on doing this I would say pull them out even if they aren't "cooked" all the way because you will be cooking them more. If not doing it this way cut one open and make sure they aren't pink and are cooked all the way!
If simmering go ahead and get your sauce ready and water on for your pasta to boil. Place meat balls in your pot with your sauce and get the heat on a medium-low. I simmered mine in the sauce for about 30 minutes.
I served these over whole wheat spaghetti and a loaf of homemade Italian bread!
It's amore!
Wednesday, February 24, 2010
Buffalo Tacos w/ Homemade Tortillas
I love tacos. I am not sure why I don't add them to the menu more often. Sometimes I get so wrapped in the new recipes, literally I think sometimes I spend hours looking for recipes! Yikes! So in my quest for some familiarity tacos were added. Buffalo tacos, because they are yummy. I am also making guacamole and homemade tortillas! Oh my, I am hungry now and dinner is still 6+ hours away!
Ok so I am trying homemade tortillas and am really looking forward to it!
Buffalo Tacos-
lets get real. I am a mom. A mom with a tiny baby. Ok well she isn't so much "tiny" as she is little, cute and oh so cuddly. So my buffalo tacos consisted of: 1 lb ground buffalo and 1 packet of Simply Organic Taco Seasoning! and there you have it ladies and gentlemen - Buffalo Tacos!
Next up Homemade Tortillas
Simple, few ingredients and so good. Don't you love when you make something from scratch for the first time as to have always buying it at the store and you are like WOW! That happened to me again. I love that when that happens.
Tortillas
prep 5 minutes, plus 20 for rolling balls out
cook 15 minutes
makes 12-15
3 cups all purpose flour, I used a hearty stoneground flour
6-8 tbs shortening, I would use 8+ tbs shortening and maybe only 6+ of lard. I used shortening and definitely imagined how different the flavors would have been with lard
2 tsp baking powder
1 1/2 tsp salt
1 - 11/4 warm water
Mix flour, salt and baking powder together. Add in shortening and mix well with a pastry cutter ( I am not a "gadget" person, but I love my pastry cutter) Cut it all in and mix well. Go ahead and roll up your sleeves a bit and starting adding water- SLOWLY! I think I used just a little over a cup. Mix it really well. Feel free to flour your hands good so you aren't so sticky. You don't want your big ball to be over sticky.
Next roll the big dough ball into 12-15 smaller balls.
Let those sit for at least 10 minutes but longer is fine.
Now for the fun part...
Lightly flour your work space and rolling pin. They actually make cute tortilla rollers, of course. But I don't have one of those so I just pulled out my big old wooden rolling pin. Actually I let my 8 year old do most of this. But when rolling it out I needed to take over.
Take it slowly. You want them to be thin, but that also makes them able to rip easier. I would roll one way, turn it over and roll the other way.
Ours were all sorts of shapes. I think we had a heart, a rectangle and no circle anywhere!
Get your skillet nice and hot. Throw one it at a time, unless your skillet it big enough to fit two.
I would say it takes close to 1 minute on each side. I watched for those little brown spots to show up. Flip and watch for more little brown spots to show up!
I had a plate with a kitchen towel and hid them in there, except the one that went in my belly until dinner was ready.
YUM!
I will say the thinner ones were more taco like. The ones that didn't get so thin reminded me of flat bread.
That is it for now! I will try to add photos soon and will also be posting my yummy guacamole too!
xo
Life is a poem...
It has been a few days. Sorry, no truly my deepest regards. I haven't cooked much this week from being in bed all day Sunday and then spending Monday making sure I was feeling 100% better. But I am back and ready to get in the kitchen, but first a little bit about my week or in particular my night last night!
So my dad is a poet. By day he is an attorney and yadda yadda that is great but by love and passion he is a poet. He is having 2 books published this year, one by Dos Madres a small but wonderful local press company here and another by Wordpress later in the year.
Last night he had his first reading in quite a while. It was wonderful. We were in the tea room of this delectable local bakery. 30 people together quiet and listening to his words. He spoke smoothly and with emotion. Real emotion, the kind of emotion that my sister and I looked at each other and got tears in our eyes. Beauty. I remember when I was a kid listening to my dads poems. I have every single one of his chat books from the 70's with his poems in it, they sit nicely on my bookshelf all in a row.
So life is a poem. My poem has included so much beauty and laughter, it has traced the lines of many pages and still after every word there is a smile. A joyous poem perhaps.
Here is my dad reading a poem he wrote for our wedding:

Here is one of my fathers poems. Read it, then go back and read it again. When you are done the second time think about it and perhaps read it again.
Walrus
It slips from my heart
Like the walrus slips
From the ice into the sea
Diving deep to dig for oysters
In the mud with his ivory tusks
But it always returns
I feel those wet flippers
And the pain from two huge tusks
Pulling that dark slippery wrinkled form
Back onto my heart
And I am frightened
Until I feel the warmth from his blubber
Which the Eskimos eat
And burn in their lamps
And I want to live and receive light
From him too
I shake again
When the walrus moves
Knowing he is hungry
And must go
I cry wait
As he slides into the water
And I hope for
The day
When my arms
will be strong enough
To wrap around and hold
The broad neck
Of this mustached whale horse
to ride him into the dark
Into the warmer water
To dig in the mud and watch
For polar bears and kayaks
By Gerry Grubbs
Saturday, February 20, 2010
A recipe I must share!
My cousin Windy sent me this recipe yesterday. These look great and I can't wait to try them. I love food that you can sneak vegetables in it and the kids will still love them.
What is your favorite recipe that "hides" ingredients:
Good Morning Muffins
2 cups all purpose flour
3/4 cup sugar
2 tsp baking soda
1 1/2 tsp ground cinnamon
1/2 tsp salt
3 eggs
1/2 cup vegtable oil
1/2 cup milk
1 1/2 tsp vanilla
2 cups peeled, chopped apples (I actually grate mine)
2 cups peeled, grated carrots
1/3 cup flaked coconut
1/2 cup raisins
1/2 c sliced almonds
Heat oven to 375 degrees. In large bowl, mix flour, sugar, soda, cinnamon, and salt. In another bowl, beat eggs. Add oil, milk, vanilla. Mix well. Stir dry ingredients. Fold in apples, carrots, coconut, raisins, and almonds. Fill greased muffin cups 3/4 full. Bake 20-25 minutes.
ENJOY!
I am really looking forward to making these muffins! Thanks cousin for sending this my way!
Thursday, February 18, 2010
Thankful Thursday
Here I am, my husband has been gone most of the week traveling with work. He was home Tuesday night for dinner and we had soup. Roslaee just fell asleep and I am going through years of recipes I have collected, scribbled and torn out of old magazines. Deciding on what to keep, what to pass on and what to get rid of so no one else has to experience them.
Grocery list making is well under way also. As well as laundry and floor sweeping. Motivated, perhaps a little.
Well, here it is. My weeks menu:
Friday- Chicken Noodle Soup with Cheddar Biscuits
Saturday- - Out, deservingly
Sunday-- Happy Shrimp Stir Fry w/ Brown Rice
Monday- Tuna Noodle Casserole, because if I make this the kids will be so good. I really should make it more often.
Tuesday- Grilled Turkey & Cheese Sandwiches w/ Tomato Soup
Wednesday- Tacos w/ Homemade Tortillas and Guacamole
The menu this week is quick and simple cooking as we have stuff 3 nights this week which means Jimmy goes home from work, we eat and head back out! Busy. What does your menu look like? What are some of your favorite things to cook?
Wednesday, February 17, 2010
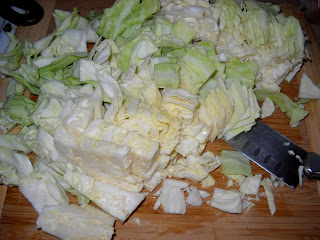
Fried Cabbage
I must share this as oddly enough I have been craving it a lot lately.
So easy, cheap and yum!
Fried Cabbage- a few different ways!
prep- 5 minutes
cook-20 minutes
serves - 3 adults +
1/2 Head of Cabbage, rinse it and chop it up into bite size pieces
It should look something like this:
3 tablespoons butter
2 tablespoons olive oil, you can use all OO if you would like
Salt and pepper
optional ingredients:
1 heaping teaspoon sugar, Optional
5 pieces of bacon, real bacon not turkey anything! Optional - if you use bacon you can skip the butter and olive oil
If using the bacon- get big skillet out and fry up your bacon. Get it nice and crispy.
Take bacon out, chop it up and save for later.
Keeping your bacon grease hot, go ahead and throw in your cabbage and start frying.
If not using bacon, just heat up your OO and butter in pan until hot and then throw in cabbage and start frying.
If using the sugar go ahead and add it now.
Salt and Pepper it REALLY good. I use a lot of salt, probably close to 2 teaspoons.
Fry it really good until the cabbage looks brighter in color and is limp. I also like some of it to get a little crispy around the edges. This takes about 15 minutes.
Once cabbage is done add your bacon back in (if using!) and toss it together. Feel free to set your skillet right on the table and let people just start eating. So good!
Unfortunately I didn't get a picture of the cooked cabbage, but will snap one next time I make it! We also had vegetable soup last night, recipe is coming! Which had the other half of cabbage in it and after we all ate our fill of fried cabbage I just threw the little bit of leftovers in the vegetable soup!
So easy, cheap and yum!
Fried Cabbage- a few different ways!
prep- 5 minutes
cook-20 minutes
serves - 3 adults +
1/2 Head of Cabbage, rinse it and chop it up into bite size pieces
It should look something like this:

3 tablespoons butter
2 tablespoons olive oil, you can use all OO if you would like
Salt and pepper
optional ingredients:
1 heaping teaspoon sugar, Optional
5 pieces of bacon, real bacon not turkey anything! Optional - if you use bacon you can skip the butter and olive oil
If using the bacon- get big skillet out and fry up your bacon. Get it nice and crispy.
Take bacon out, chop it up and save for later.
Keeping your bacon grease hot, go ahead and throw in your cabbage and start frying.
If not using bacon, just heat up your OO and butter in pan until hot and then throw in cabbage and start frying.
If using the sugar go ahead and add it now.
Salt and Pepper it REALLY good. I use a lot of salt, probably close to 2 teaspoons.
Fry it really good until the cabbage looks brighter in color and is limp. I also like some of it to get a little crispy around the edges. This takes about 15 minutes.
Once cabbage is done add your bacon back in (if using!) and toss it together. Feel free to set your skillet right on the table and let people just start eating. So good!
Unfortunately I didn't get a picture of the cooked cabbage, but will snap one next time I make it! We also had vegetable soup last night, recipe is coming! Which had the other half of cabbage in it and after we all ate our fill of fried cabbage I just threw the little bit of leftovers in the vegetable soup!
Monday, February 15, 2010
Better than your moms Chicken Noodle Soup!
Ahh, really what is better than a warming bowl of chicken noodle soup. It warms you from the inside out and delights every bit of you! Served when your sick, on a nice fall day as the leaves turn or today when this snow hasn't stopped falling since the night before!
I love chicken noodle soup. It is budget friendly, healthy and so delicious! ok, ok here is my recipe!
Chicken Noodle Soup
prep- 2.5 hours includes making stock
cook- 25 minutes
serves- A lot!
Stock w/ chicken (recipe below!)
2 tablespoons Olive Oil
4 Carrots, sliced
1 large onion, diced
4 cloves garlic, minced
3 stalks celery, chopped
Chicken broth, optional
Egg noodles or any other fun pasta shape you have in your pantry
Dried basil
2 bays leaves
Stock:
Carcass of your roasted chicken
Vegetable peels - carrots, onions, garlic (I keep a bag in the freezer full of peels from previous meals- makes making stock easy!)
Place your carcass and all the pan drippings in your stock pot. Add vegetable peels to this and a bay leaf. I would also add about 1/2-1 tablespoon of salt.
Cover with water and bring to a boil. I let this simmer for a few hours on my stove. I love how it makes the entire house smell yummy! You can cook over medium-high for about 45 minutes to an hour if you don't have time. But for this I would recommend making the time. So good.
After a few hours you should have this dark broth in your pot. Ok get out a very large bowl and your strainer. Strain you broth, throwing out the vegetables but NOT the carcass, just yet!
Cooking it slow and low see how the meat is falling off the bones. I am not one to like dark meat, picking bones etc but for this soup I would do it anytime!
I pick through the carcass getting all of the meat off of the bones and adding it directly back into my broth. I normally can get a good amount of chicken from the carcass.
Ok leave that in your bowl.
Put your stock pot back on your stove, I don't even rinse it.
Add about 2 tbs olive oil to your pot and turn heat on medium. When that is hot go ahead and add your onion. Saute for a few minutes then add your garlic. Add a heaping teaspoon of salt to this now and listen to it sizzle!
Next add your carrots and celery cooking for about 5 to 8 minutes.
Once everything looks nice and sauteed, onions are translucent go ahead an add your broth with the chicken. Add your bay leaves.
Now, you can leave this as is and save for another day or keep it cooking for dinner that night!
If you are planning on eating go ahead and bring to a boil- taste it, see if it needs more salt. Sometimes if the broth doesn't taste "chickeny" enough I will add a cup or two of chicken broth.
Once it is boiling go ahead and add your pasta- about half a bag.
Once your pasta is done EAT IT!
Serve in nice big bowls making sure to get all the veggies, chicken and noodles!
Sunday, February 14, 2010
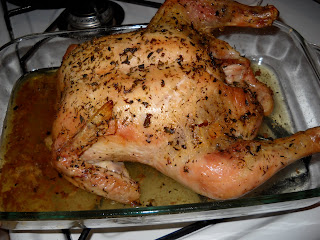
Basic Roast Chicken for my Valentines!
Ahh, Valentines Day! A day for lovers, friends and family! We don't really "celebrate" it but I do use it as an excuse to make an extra special dinner AND a reason to ask for my one treat that I LOVE! Lake Champlain Chocolates! Dark Chocolate Sea Salt Caramels! WOW! These make me happy. I savor every one. Goodness these are good!

One thing I love to cook is a basic roasted chicken. After talking to many mamas about roasting a chicken and how simple it is, I found out that many don't know how to do it! I can get 2 meals out of a roasted chicken which makes it even better!
So for Valentines Day, I am making an Herb Roasted Chicken, Roasted Vegetables and a Chocolate Coconut Pudding!
Here is one of my valentines, my boy Camden. He keeps me on my toes! He likes to talk, draw and is an excellent big brother!

He likes my chicken too, so that's a good thing!
Basic Roast Chicken
prep- 15 minutes
cook- 1.5 hours
serves- easily a family of four
1 Roaster or Fryer Chicken, 3-4 lbs
Salt and Pepper
3 - 4 cloves of garlic, peeled
Olive Oil
2 tablespoons butter, optional
Dried Herbs, I like thyme, oregano, basil, rosemary is yummy too!
1 Apple or Lemon, Optional
Pull out any parts that are on the inside, I toss them others may use them for stock etc. Rinse you chicken good under cold water. Pat dry and put in your pan, breast side up. I use a glass dish, nothing fancy.
If using an apple or lemon go ahead and stick it right in the birds rear end. Yep, stick it right in the booty of the bird! This will help keep your bird moist and tender and give it a nice little flavor. No need to cut it or anything just stick it right in.
Take a knife and cut 2 slits in each of the breast and stuff your garlic in there.
If using butter go ahead now and rub it all over your bird.
Take olive oil now and drizzle it on top of your chicken. This will help your herbs stick and produce a nice crispy skin on your chicken.
Salt, salt, salt! So good Salt and pepper your chicken really good. Again I use the Celtic Sea Salt! yum!
Sprinkle your herbs on really good. I just shake each one all over my bird, on at a time until the top of my bird looks nice and covered. Probably about 1 teaspoon of each.
Heat oven to 400 degrees.
Yep, no need to preheat your oven. I have actually heard that it doesn't matter to preheat unless you are baking. So wait to turn it on until you are ready to use it!
Stick your bird in the oven. Bake it for about 1 -1 1/2 hours. It will bake for about 20 minutes per pound. I normally watch for my legs to start to pull apart from the body and clear juice to run out if I pierce it! Let it rest for about 15 minutes before cutting it!
AND don't throw that carcass away- tomorrow Chicken Noodle Soup!
Here are my other Valentines! Jimmy and Rosalee Sage!


One thing I love to cook is a basic roasted chicken. After talking to many mamas about roasting a chicken and how simple it is, I found out that many don't know how to do it! I can get 2 meals out of a roasted chicken which makes it even better!
So for Valentines Day, I am making an Herb Roasted Chicken, Roasted Vegetables and a Chocolate Coconut Pudding!
Here is one of my valentines, my boy Camden. He keeps me on my toes! He likes to talk, draw and is an excellent big brother!

He likes my chicken too, so that's a good thing!
Basic Roast Chicken
prep- 15 minutes
cook- 1.5 hours
serves- easily a family of four
1 Roaster or Fryer Chicken, 3-4 lbs
Salt and Pepper
3 - 4 cloves of garlic, peeled
Olive Oil
2 tablespoons butter, optional
Dried Herbs, I like thyme, oregano, basil, rosemary is yummy too!
1 Apple or Lemon, Optional
Pull out any parts that are on the inside, I toss them others may use them for stock etc. Rinse you chicken good under cold water. Pat dry and put in your pan, breast side up. I use a glass dish, nothing fancy.
If using an apple or lemon go ahead and stick it right in the birds rear end. Yep, stick it right in the booty of the bird! This will help keep your bird moist and tender and give it a nice little flavor. No need to cut it or anything just stick it right in.
Take a knife and cut 2 slits in each of the breast and stuff your garlic in there.
If using butter go ahead now and rub it all over your bird.
Take olive oil now and drizzle it on top of your chicken. This will help your herbs stick and produce a nice crispy skin on your chicken.
Salt, salt, salt! So good Salt and pepper your chicken really good. Again I use the Celtic Sea Salt! yum!
Sprinkle your herbs on really good. I just shake each one all over my bird, on at a time until the top of my bird looks nice and covered. Probably about 1 teaspoon of each.
Heat oven to 400 degrees.
Yep, no need to preheat your oven. I have actually heard that it doesn't matter to preheat unless you are baking. So wait to turn it on until you are ready to use it!
Stick your bird in the oven. Bake it for about 1 -1 1/2 hours. It will bake for about 20 minutes per pound. I normally watch for my legs to start to pull apart from the body and clear juice to run out if I pierce it! Let it rest for about 15 minutes before cutting it!
AND don't throw that carcass away- tomorrow Chicken Noodle Soup!

Here are my other Valentines! Jimmy and Rosalee Sage!

My Dads Vegetable Soup, made my way!
My dad isn't the cook in the family, that would be my mom. Pictured below:

My mom after I had Rosalee, See the apron she was here cooking for me!
Also photographed is my brother Trey also an amazing cook and my niece Lulu!
She cooks, she cooks and she cooks some more. I always loved watching her cook and to this day I still do. I can just stand there much like a fly on the wall and watch how she cooks no matter what it is I enjoy it!
My dad on the other hand he doesn't cook, he writes poetry and watches football except when it comes to a few things. One being his pasta sauce that has whole eggs, chicken thighs and entire sausages in it. You wouldn't believe how unbelievable that sauce is. I never appreciated it until now as I am in the kitchen wondering how he did it. He went vegan which is great but with that he stopped making his sauce and that isn't great. And his vegetable soup. Ahh, this I did pick up and mainly because I called him a few months ago and asked. This he told me what to do and I ran with it, when I ask about his sauce he just says umm ya a little of this and a little of that.
Pictured: A few of my favorites!

My Dads Vegetable Soup Made My Way
prep- 20 minutes
cook- 2 hours
serves- A lot
2 tbs butter, optional or vegan butter (Earth Balance) if you choose
2 tablespoons olive oil
2 medium onions, diced
4 cloves garlic, roughly chopped
3 large carrots, cut into bite size pieces
3 stalks celery, cut each into 4 strips and chop
4 yukon gold potatoes, peeled and chopped - You can use what ever potato you have on hand
1 turnip, peeled and chopped
1/2 head of cabbage, chopped
4 cups vegetable broth
1 bottle of v8, SPICY
2/3 cup frozen vegetables, optional I like green beans, corn peas in mine
Get out your large pot. Add butter if using and olive oil to your pot keeping heat medium low. Once those are melted and hot add your onion, give it a good stir. Throw in your garlic and a nice big pinch of salt. Let those guys keep cooking while you are getting rest of you vegetables together. Keep your heat low, not to burn your stuff but enough to keep things cooking. I love that smell, onions and garlic. yum.
Add celery and carrots. Stir them good letting them cook for a few minutes.

Add potatoes and turnips. Stir them good letting them cook for a few minutes.
Add the cabbage, ok you know what to do.

I let that all cook for about 15 minutes, sauteing them all together, making them happy.
Now your pot is going to be really full of vegetables. Almost to the top of your pot. I like that.
Add your broth. Go ahead now and pour in the V8 until your pot is full. Now I simmer this for a little while, an hour or so.

Ladle into big bowls and enjoy!
I served this tonight with some stir fried tofu and a loaf of garlic parmesan focaccia bread!
To my dad! Love you so much and thanks for all that you have taught me!

Fantastic Shrimp Friday!
Well, today has been semi productive. Lets see, I broke one of my favorite bowls, I burnt a batch of graham crackers and my back is in some serious pain. Woohoo. But on a positive note I have these pull apart rolls rising on the stove as we speak. Some of my favorite friends are also chopped for tonight’s dinner. Ahh and I forgot pictures tonight because it was just that kind of day! Hope you enjoy this dish!
Sauteed Shrimp in a Ricotta Parmesan Sauce with Peas
3 cloves garlic, minced
1 onion, sliced
1 lb pasta, I normally like shapes but this sauce is good on fetticune
1 lemon, will need just a squeeze
Parmesan Cheese
2 tablespoons butter
1-2 tablespoons olive oil
1 tub of ricotta cheese, my favorite is the amazingly creamy and so delicious ricotta made in Vermont
1 cup of frozen peas
1 cup of chicken broth
1/2 cup of pasta water
Shrimp, enough for your family. I say that because tonight this meal is going to feed 5 people and I am defrosting about 15 shrimp which are large enough to cut in half. This dish can be made with what you have on hand.
Go ahead and put your pasta water on. In a large skillet put butter and oil in and melt together. Add onion and garlic and a nice pinch of salt.

My favorite salt...
Ok there, a picture. I needed a picture and well it is my favorite salt. I actually just made some peanut chocolate chip cookies I then topped off with this salt! YUM!
Ok Ok back to the pasta. I like the heat medium as I am sauteing, a little lower if you are as absent minded as I am sometime and doing 12 other things.
Saute those until your onions are nice and limp. Next I threw in a few cherry tomatoes because they needed to be used up. I sauteed those in with my onions and next put in a nice big squeeze using half the lemon.
Add shrimp and saute. My shrimp were cooked so I just needed them warm.
Add your peas now. Pasta should be done so go ahead and drain, reserving some water.
Ok, so here goes the rest of this yummy dish.
Add you pasta to your skillet, if it is big enough. If not put pasta back in pot and add the sauteed veggies and shrimp to the pasta pot.
Add your chicken broth, keeping your heat on low. Add pasta water.
Stir it all up, I use a pasta fork or spoon or whatever that big pasta thingy is and another big wooden spoon to help.
Now, get out that yummy ricotta cheese and add about half the container, I would say that is about 3/4 cup to 1 cup. Stir it all around really nice, adding more broth/water to get it to a nice consistency that isn’t so thick.
Plate it, eat it, love it.
We love this dish, I love the ricotta and that splash of lemon that makes me want spring even more. I do believe that lemon really livens up the dish and quite often add it to many of my pasta dishes for a little more love!
Needless to say everyone here loves this. We had friends over who brought a salad, vanilla bean ice cream and apple pie! It was quite a feast we enjoyed tonight!
xo
rach
All in a day.
Here I am this cold Thursday morning, enjoy the silence in the house. Camden is back at school, Jimmy and Rosalee are still snuggled in bed and the dogs are outside. Ahh the house is mine! Thursday is like my off day from cooking, a day where I can chug a kombucha, make a sandwich and enjoy a evening with just me and the kiddos and what ever leftovers sound good. Jimmy works late on Thursdays so I take the night off from cooking too! This morning after my drink is gone and I am done typing for the moment I will turn my tea kettle on and pull out my sewing machine and try to enjoy a few more moments of my time!
Thursday is also the day I make the grocery list. I scour the cabinets and ask everyone what they would like this week.
So here is what we are having this week:
Friday – Shrimp Pasta, with local ricotta cheese, peas, parmesan, sauteed onions and garlic…drool.
Saturday- My Dads Vegetable Soup and Homemade Bread
Sunday - Valentines Day – Roast Chicken, Roasted Root Vegetables and Homemade Rolls. I will also make a special dessert for my valentines!
Monday- Leftover Vegetable Soup, Fried Tofu, Peanut Butter and Crackers
Tuesday – Homemade Pasta Sauce and Spaghetti
Wednesday – Craft Day aka Crock Pot Day
Ahh, I forgot to mention baking.

I smile just like this through all my baking...
So this week will include homemade Graham Crackers and some experimenting with Chocolate Chewies and Chocolate Zucchini Bread. No I will not eat all of these, taste perhaps but not devour. Thankfully I have some events that are in need of donations this week. Oh and did I mention cinnamon rolls. Thanks to a sweet friend those have been added to the list. Those I may devour.
Craft day, and all it brings.

Rosalee's wool soakers!
So after Rosalee was born I found myself home alone with a tiny baby. Don’t get me wrong I loved it, it wasn’t stressful as she is a great sleeper and eater. But for myself I need a bit more stimulation, some one to talk to, have tea with; simply I love company. So after pondering a few ideas Craft Day was created. I set a goal for myself – learn how to do something, I can cook but I wanted to be crafty. It is open to our community here, I have an open door just bring a snack to share and a craft if you feel like it.
What I began realizing after these Wednesdays were over it really had nothing to do with the crafts it had to do with our village. My need for a village. A village of women, mothers and grandmothers. A place for us to unite to talk, laugh and cry. A place where everyone felt safe to talk about their feelings or to not feel alone as they journey through becoming a new mother or dealing with a tantrum throwing 2 year old. A village of women that were also in need of the same thing but not sure how to get it. I need and love craft day. And the bonus is that I do get to use my sewing machine!
So from my village to yours THANK YOU! It is wonderful having such awe inspiring amazing women in my life and for that I am grateful! Much love to you all! I also must put a quick line in here also about so many women that are in my life that either can’t come to craft day or live out of state- you are equally as touching and moving in my life, I am blessed to know you all!
ps. this craft day I made doughnuts, no sewing. They were baked doughnuts which you can find the recipe here:http://whatscookingamerica.net/Bread/BakedDoughnuts.htm
They were pretty good, a lot healthier than fried. Mine did not rise very well today, this has been on of the first things I have baked that had issues rising but after baking they still tasted great! A nice afternoon treat with a yummy cup of tea
Snow Day!!
Snow Day!! Well we have about 4-5 inches of snow, and for here that almost shuts the city down! Camden was home from school today so we have spent the day relaxing, playing in the snow and of course drinking hot chocolate! We strolled through the neighborhood enjoying all the snow falling down around us.
Rosalee enjoyed her first time in the snow and came home and shortly afterwards fell asleep.

Rosalee all tuckered out from our walk in the snow!
So simple hot chocolate:
4 tbs sugar
4 tbs cocoa powder
3 1/2 cups whole milk
1 tsp vanilla
a dash or two of cinnamon
Whisk in your pot the milk, vanilla, sugar and cocoa powder. Stir it really good mixing it all! Turn heat on low, still whisking. Is it all mixed up yet? Let it simmer on low for about 5-7 minutes or until it is hot enough for you. Pour into your favorite mugs and sprinkle a bit of cinnamon on each! Serves 2-3 depending on size up mugs!
Note to self drinking hot cocoa while wearing 3D glasses makes it even better!

Camden enjoying hot cocoa from his favorite mug!
Simple and good enough to warm your toes on these snowy days!
Buffalo Pot Roast
*Please note this is my first recipe post, and it may not be perfect yet still trying to figure out the picture thing!
Lets start with Buffalo. If you eat red meat and have never tried buffalo – GO get some NOW! It is a great cut of meat and very lean. It doesn’t taste gamey either, if that is what you were wondering. I also got the meat on sale this week at our local Whole Foods Market- so it was an easy addition to our menu for the week.
Ingredients
2-3 lb Buffalo Pot Roast
5-6 yukon gold potatoes, roughly peeled (meaning I quickly ran a peeler over the potatoes and so yes there is still skin on some!) You can use other potatoes if that is what you have on hand. I like yukon golds as they taste like butta!
4 carrots, cleaned off and sliced. I don’t peel ‘em just rinse um good as the skin is the best!
2 yellow onions, sliced in half then quarter the halves
3 cloves garlic, chopped
4 cups beef broth
3 tbs flour
2 bay leaves (optional)
Alright, first thing is first. Get out some salt and pepper and cover your pot roast really good. I like to use the celtic salt, those really nice big chunks. Cover the top, bottom and sides. Turn your cast iron skillet on- this is where it gets fun and smelling good! Put about 2 tablespoons of oil in your skillet- get it really nice and hot. Then take that nice hunk of meat and stick it in your skillet-

Hear that sizzling...
hear that sizzle… That seals in all the juices on the roast.
You want to end up with a nice golden brown crust all around your roast.

See the nice golden crust its getting..
After that is finished go ahead and set that in your crock pot. Now if your cast iron is big enough you can add your carrot s and potatoes to it to soak up a little of your oil that you cooked your roast in, if not no worries just throw them on in the crock.
However I would go ahead and add your onion and garlic to the pan, saute those for a few minutes. While they are cooking in the oil (add a few more tablespoons if you need to) go ahead and add your flour. Stir that up really good in the oil, onions and garlic. Once that is mixed good really good and you have a nice little simmer going on turn off your stove and empty your skillet right into your crock pot.

See how nicely it fits in there!
Feel free to add a bay leaf or two now, if you like them. I like them but just forgot them and that is ok! See how it all fits in there so nicely!
Turn the heat on high and cook about 6 hours or on low for 8 to 10 hours.

Yum
Ok, now get out your big pretty bowl and scoop out those vegetables and some broth. Get your meat out and put right on top, careful that meat is so tender it just falls apart and you don’t want to leave any behind.
If you are feeling up to it you can make a gravy with some of the juices from the crock. I added 2 tablespoons butter and 2 tablespoons of flour into my cast iron and mixed them well. Then just ladled in some sauce and kept stirring and adding more juice til I got it the consistency that I wanted. Add a few good shakes of salt to this too!
I also made Whole Wheat Buttermilk Rolls to help sop up some of those juices, but thats for another day!
This served 4 with a small container of leftovers.
A bit more about me...
So first post of the blog. My nerves are a little shaky as I figure out what I want to write about first! So I guess first thing is first – a little about how I cook, what we eat and why we do it!
I cook. Alot. I like to be in the kitchen (normally with a baby attached to me in her sling) chopping, sprinkling or tasting yummy foods. I try to make all of our food from scratch and as you can imagine with kids, dogs and a husband I need from scratch cooking to also be SIMPLE and healthy.
I try to use all natural and organic products as often as I can. Oh and of course seasonal and local foods too.
I like a pinch of that and a pinch of this in my food. I love butter, olive oil, coconut oil and my new cast iron skillet. Salt, did I mention that I love salt. I salt all my food before I even taste it because it is going to need more salt anyway.
Like I said, I try to keep my recipes simple and cost effective. I will also share ways that help save us money and perhaps even highlight a sale we have going on here close to home.
Other things that may show up here as I am passionate about them as well is sewing projects, guest blogs from other amazing women or a parenting topic that I must share. Ideas, opinions or a love note- please share them with me!
xo
Rach
Subscribe to:
Posts (Atom)

